Mr. Johnson's Art
DRAW A CARTOON CHARACTER IN ANIMATE (PART 1)
Follow the directions and watch the videos for this.
In this lesson, you will learn how to draw your own cartoon character using Adobe Animate!
This project has TWO PARTS, because I can only put so many videos on one web page,
so make sure you finish this with part 2!
STEP #1
First, Open Animate by clicking the icon that looks like this:

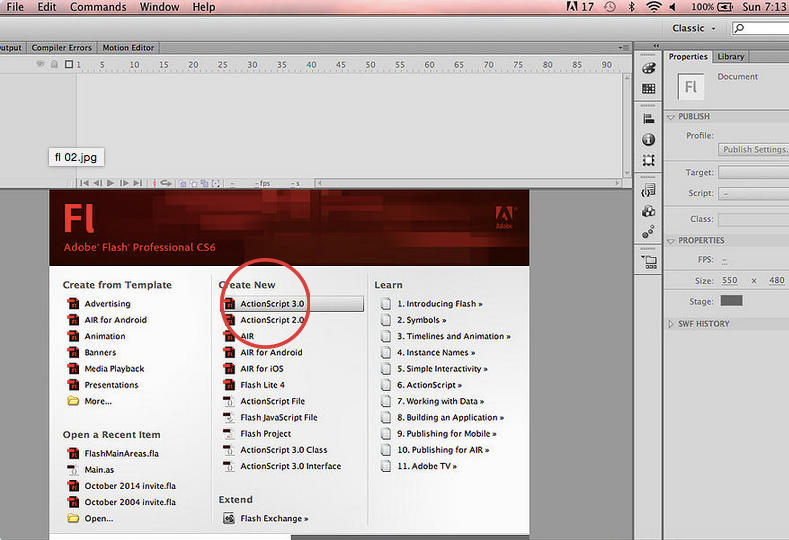
At the first screen you see, choose ActionScript 3.0.
This is your “Stage”, just like Photoshop’s Canvas.
This is the area that you will be working on.
You will see a “TOOLBAR” similar to the one in Photoshop.
This Toolbar is on the other side of the program!
You can mouse over each tool to see what it’s called.
Step 2
Let draw the head!
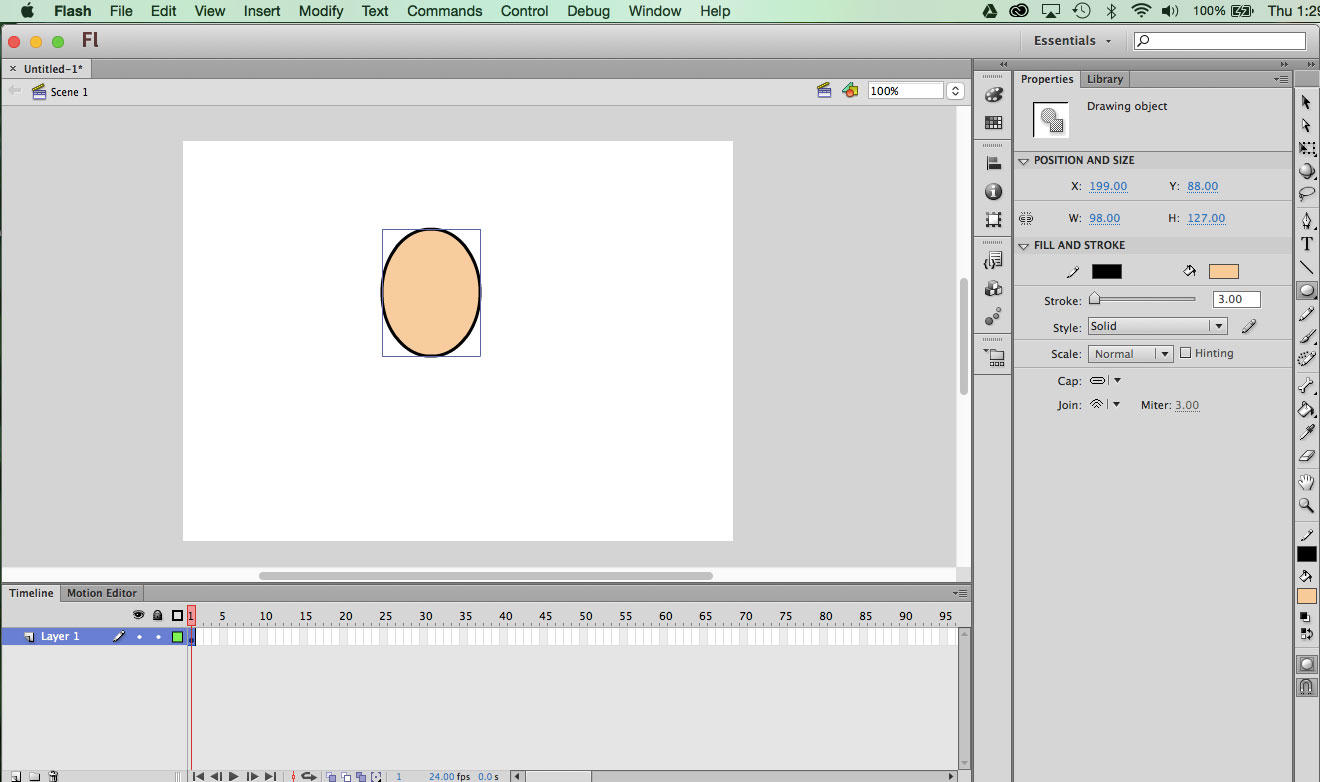
For this we’re going to use the OVAL TOOL.

Now let’s choose the LINE COLOR (also called STROKE COLOR) and FILL COLOR.
Choose BLACK for the LINE (STROKE) color.

And choose a FLESH TONE as the FILL COLOR.

For STROKE SIZE (how thick the line is), it’s good to choose about 3.0 for drawing cartoon characters.

Draw an OVAL shape on the Stage (near the top)!
Step #3
Flash has Layers like Photoshop!
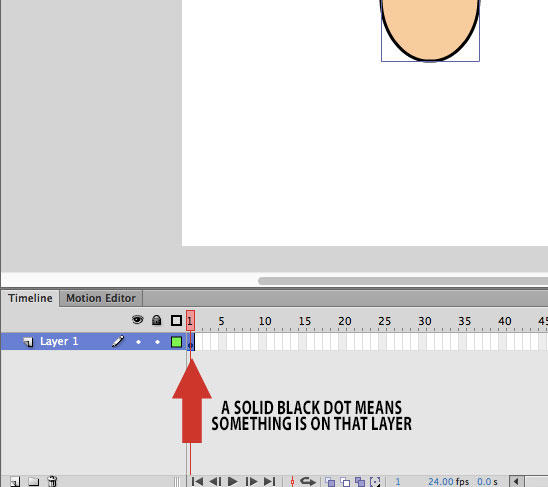
If the circle is just an outline, it means that there is nothing on that layer.
One GOOD IDEA is to NAME YOUR LAYERS!
Double click and you should be able to rename it. It will help keep track of different parts of the body later!

BIG TIP: It really helps to do things on separate layers!
Step #4
Let’s Add a Layer and Draw a Chin!
Click the New Layer Button:

And a New Layer appears!

Double Click and name the New Layer “CHIN”.

You will notice is has a circle that is not filled.
That’s because there is nothing on that layer yet.
Now, use the same OVAL TOOL to draw a chin on the Chin Layer!
Draw whatever kind of chin you like, it doesn’t have to be just like mine.
Step #5
Let’s check out the ERASER.
The ERASER has several different options you can choose.
For this case, I want to erase lines only, so I will choose ERASE LINES.
Go back to your drawing, zoom in (COMMAND +) and erase the lines as shown in the video below.
Step #6
Let’s Draw an Ear!
OK, create another new layer like you did with the chin (see above). Name it EAR.
Now you are going to draw another circle where you would like your ear to be. See video below.
You will also use the eraser to erase the lines, just like with the chin.
Step #7
OK, Time for the Eyes!
OK, create another new layer like you did with the ear (see above). Name it EYES.
Now you are going to draw an oval or circle where you would like your first eye to be.
Set STROKE to 2.0 and FILL to WHITE. See video below.
Then draw your first eye.
You might want to move your eye a little. Use the SELECTION TOOL (Black Arrow).
DOUBLE CLICK the eye, and then drag it to where you want it.
Now we want to COPY your eye, and PASTE another one.
Go to EDIT > COPY (or COMMAND + C) and then EDIT > PASTE IN PLACE (or COMMAND + SHIFT + V).
Then use the SELECTION TOOL to move it to where you want it.
See video below.
Step #8
OK, Time for the Pupils!
OK, create another new layer like you did with the eyes and call it PUPILS.
You are going to want to change the STROKE COLOR to NOTHING (the box with the red line), and the FILL to BLACK.
Move your cursor over one eye.
Hold the SHIFT key down, and draw a small circle. Holding the SHIFT key gives you a perfect circle.
Use the SELECTION TOOL, and click the pupil.
Use the arrows on your keyboard to move the pupil to where you want it.
Then, click on the pupil, and EDIT > COPY (CONTROL +C) and EDIT > PASTE (COMMAND + SHIFT + V).
Use the Select Tool and the arrows on the keyboard to move the pupil to the other eye.
CHECK OUT THE VIDEO BELOW!
Step #9
It’s Time for a Nose!
OK, create another new layer like you did with the Pupils! Call it NOSE!
We are going to use a different tool for this part. We’ll use the PENCIL TOOL.
Basically, it draws like a pencil.
If you hold the SHIFT key when you draw with it, you will get a straight line.
Otherwise, it will just draw like a regular pencil.
Make sure the STROKE is till set to 2.0, and will need to change the PENCIL COLOR to BLACK.
So, watch the video below, and draw any kind of nose you want. Doesn’t have to look like mine!
Step #10
I Think Your Character Needs a Mouth!!
Create one more new layer and name it MOUTH.
Before we create the mouth, let’s lock all the other layer besides the mouth.
Click the LOCK button on top of the Layers, and UnClick the lock on the Mouth Layer.
Use the Pencil Tool one more time to draw whatever kind of mouth you want!
Now draw a second line creating the “inside” of the mouth.
Now we want to choose the Paint Bucket Tool.
Make sure the FILL COLOR is BLACK.
Look below on the TOOLBAR and click GAP SIZE.
Choose CLOSE LARGE GAPS. Sometimes the lines aren’t connected, even if they look like they are, and this will connect them.
Go to the mouth and click with the Paint Bucket. It should fill in black.
See video below.
Step #11
Time for Some Hair!
Unlock all the layers by clicking the lock at the top of the layers.
Use the EYE DROPPER TOOL, and Click on the line of his face.
This will set the PENCIL TOOL with the same size line as the face was drawn with!
Now make a new layer, and name it HAIR!
Use the Pencil Tool and draw some hair (See the video below).
Then use the Paint Bucket, change the Fill Color to whatever you want, and Fill the hair with that color.
The PAINT BUCKET might be hiding behind the INK TOOL, so if you click that, the PAINT BUCKET will appear.
Step #12
Let’s Add Eyebrows!
Add a new layer, and call it BROWS.
For this we are going to use the LINE TOOL. Guess what? It draws straight lines.
Choose the Line Tool, and draw a straight line where the eyebrows should be.
See Video Below.
Step #13
This Cartoon Needs A Body!
Add a new layer, and call it NECK.
For this we are going to use the RECTANGLE TOOL.
Make sure the STROKE is 3.0 and the FILL COLOR is the same as the face.
Use the EYE DROPPER TOOL if it isn’t, to match the color.
You can check out the video below, but this is what you’re going to do:
Choose the RECTANGLE TOOL, and draw a neck about where one would be.
If it needs some adjustment afterwards, just use the SELECT TOOL and DOUBLE CLICK it then move it.
Click on the FREE TRANSFORM TOOL (just like COMMAND + T in Photoshop).
You will see all the points on the corners and middles of the line.
Move off to the corner a bit, and rotate the neck slightly.
The last step is to put the neck under the head.
Grab the Neck layer, and drag it until it is under the Head layer!
The video below will go through all these steps!
Step #14
Keep Drawing the Body!
Make a new layer above the NECK, but below the HEAD. Call it BODY.
To make our body, we will use the LINE and PENCIL tools.
Again there will be a video at the end showing how to do this.
OK, choose the LINE tool. Make sure the STROKE is set to 3.0.
Draw a Triangle shape, line by line (again, see video at end).
Switch to the PENCIL TOOL and draw a body. It might take a few tries.
If the body seems “jagged” you can choose the PENCIL MODE (at the bottom of the toolbar)
and then choose SMOOTH.
You can also use the SELECTION TOOL to adjust lines. Check out this video…
LEGS!
First, make a new layer called LEG.
OK, use the LINE TOOL to draw a leg.
Use 6 lines to draw it. Check out the video below.
After you draw your leg, CHOOSE A FILL COLOR, and use the PAINT BUCKET to fill it.
Now go to the BODY layer, and draw a straight line across the lower part of the body.
Use the paint bucket to fill it with the same color as the leg.
From your program, go to FILE>SAVE AS and choose DESKTOP,
then drag from the DESKTOP to GOOGLE DRIVE and the Correct Class Folder.
Go on to Draw a Cartoon Character with Animate Part 2!
This site provides information using PDF, visit this link to download the Adobe Acrobat Reader DC software.