Mr. Johnson's Art
CREATE A MAGAZINE COVER IN INDESIGN & PHOTOSHOP
Before you start this project, talk to me about it! (That’s me, Johnson)
In this lesson, you will use InDesign and Photoshop to Create Your Own Magazine Cover!
Here are some sample magazine covers to give you some ideas.
Please don’t copy the covers you see here!
MAKE YOUR OWN MAGAZINE NAME!
Your Cover Should Look Like a Magazine You Would Find in a Store!
Look around the room for examples.


OK, this is going to be a 2 step process.
The first step will be to Google some images of the types of magazines you like (school appropriate, please!)
to get some ideas for what you want to do.
InDesign is a program that works together with Photoshop.
You will take pictures you make and cut out, and put them in Photoshop.
Once your graphics are done in Photoshop save it, and we will put it into InDesign.
Then you will type and layout all the words and text with InDesign.
THE MOST IMPORTANT THING TO REMEMBER IS:
YOU HAVE TO SAVE BOTH YOUR INDESIGN FILE AND YOUR PHOTOSHOP FILES INTO GOOGLE DRIVE!
What’s the most important thing?
You have to save both your InDesign file
and your Photoshop files into
GOOGLE DRIVE!
STEP #1
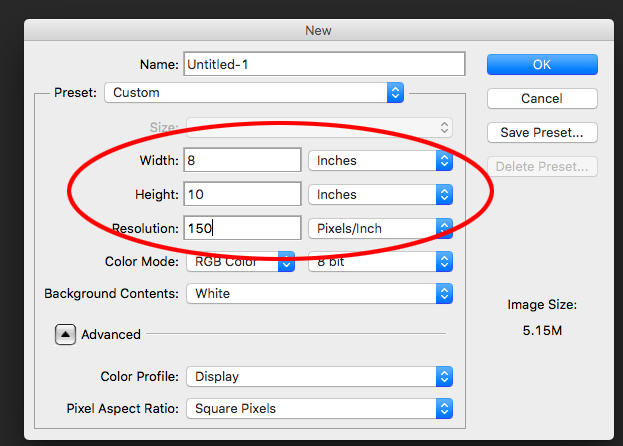
The first thing you need to do, is make your "canvas size", the place you are going to put your pictures on.
Open Photoshop, choose File>New.
Make the image size 8 inches wide by 10 inches tall.
Make sure it is at 150 resolution. (See Settings Below).
You need a photo or photos for your cover!
Your photo should be at least 2000 pixels in size (when you search for it.)
When you find what you want, click VIEW IMAGE, then CONTROL + CLICK and COPY IMAGE.
Choose EDIT > PASTE.
You need to resize your picture to fit your magazine cover.
In Photoshop, go to EDIT/TRANSFOM (Command + T).
Remember to hold the shift key, and pull from the corner!
Use as many pictures as you need to fill up your cover.
STEP #2
Create your InDesign document.
First, Open InDesign by clicking the icon that looks like this:

At the first screen you see, choose Create New Document.
Then click OK.
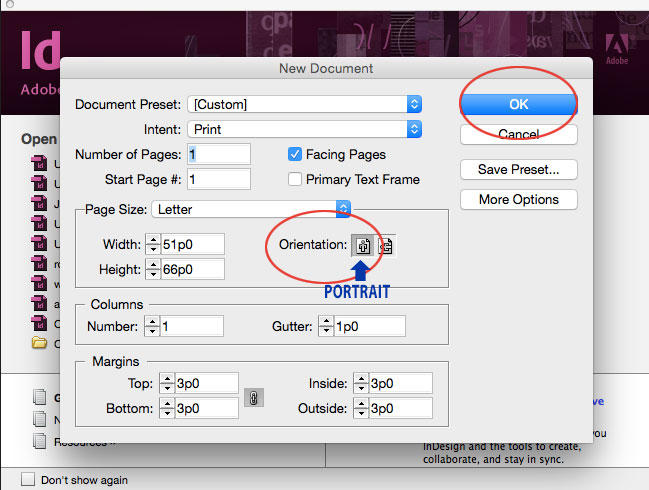
This is your 8.5 x 11 “Canvas“, just like in Photoshop.
This is your “paper” that you will be working on.
STEP #3
With your magazine cover open, choose File > Place.
.jpg)
Then click on your file on the Desktop. Click OPEN.
Choose your Photoshop file.
Click in the upper LEFT corner where the pink lines meet. Your graphic should appear.
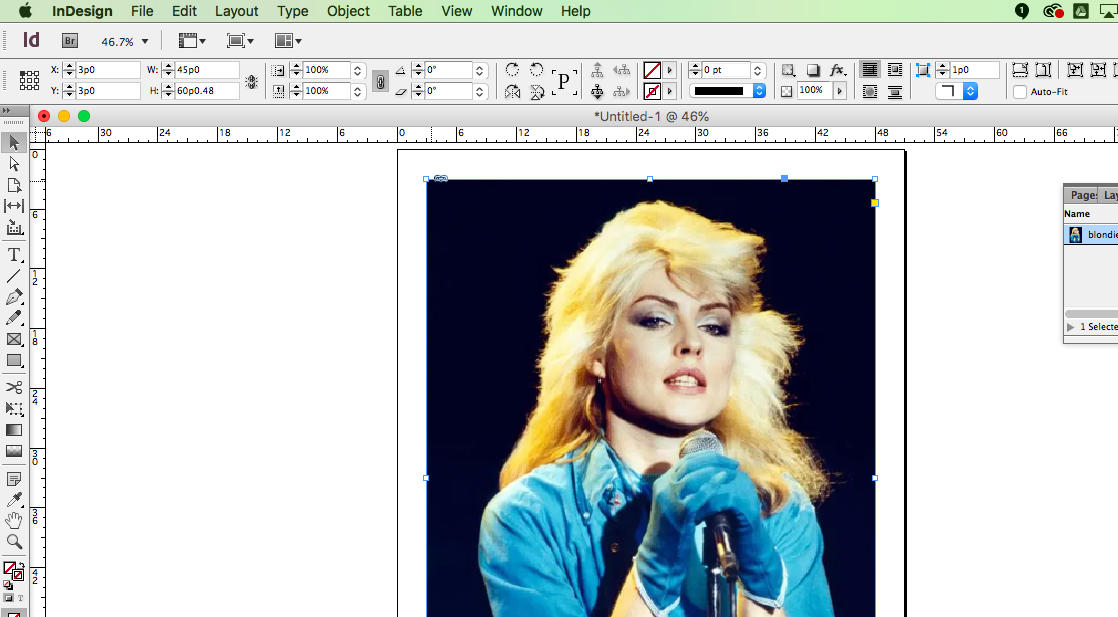
Move your graphic with the black arrow selection tool to where you want it.
Be careful of the PINK BORDER LINES on the SIDES and TOP.
Your graphic and text will be cut off at this point when printing.
Hold down COMMAND + SHIFT and pull from the corners to shrink or enlarge your graphic.
If you hit the “W” key, the blue border lines will go away and you can see what your cover is really looking like.
.jpg?mask=1)
STEP #3
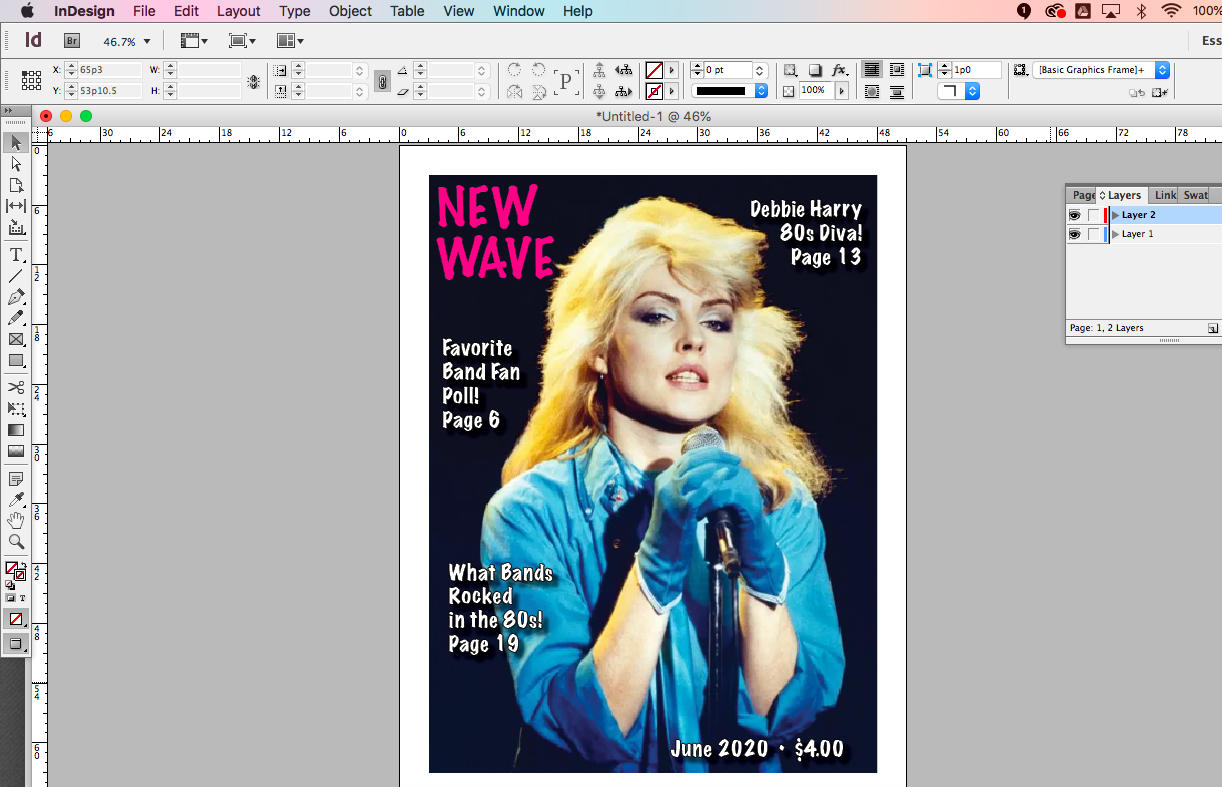
Make a new layer above the photo layer (just like in Photoshop!)
Using the text tool (The same tool you used for the Song Lyric project)
Begin typing in the text that you want.
Change the size, change the font, change the color!

Use the black arrow Selection Tool to move it where you want it.
Lay out the rest of your text how you would like it. Use your rough draft drawing to help you figure it out.
Check out REAL magazine covers for ideas if you get stuck. Fonts, Colors, and Different Sizes help out.
STEP #4
So your text is all over the place. Now what?
You will need:
A Name for your Magazine. (Make one up.)
3 pretend articles with page numbers.
A Date and Price.
Continue moving things around until you have a cool looking cover.
Don’t forget things like DATE, PRICE, etc.
Look at the samples at the beginning of the lesson for layout ideas!
Let me see it before you submit it.
When complete, export your magazine cover as a PDF file.
Go to FILE > EXPORT.
Choose DESKTOP. Then SAVE.
On the next screen, just click OK.
Keep clicking OK until it creates the file!
From your program, go to FILE>SAVE AS and choose DESKTOP,
then drag from the DESKTOP to GOOGLE DRIVE and the Correct Class Folder.
Save your final files in Google Classroom.
Just add the file from Google Drive.
Make sure you save all three PHOTOSHOP, INDESIGN, and PDF files!
This site provides information using PDF, visit this link to download the Adobe Acrobat Reader DC software.