Mr. Johnson's Art
ZOMBIFY YOURSELF IN PHOTOSHOP
STEP #1
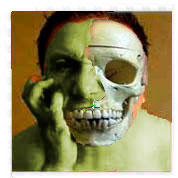
Here are examples of work.


OK, first thing is to open a picture of your face into Photoshop.
You should know how to do this by now!
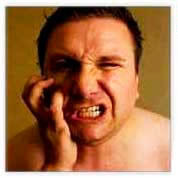
Use a camera to take a photo similar to the one above.
Make sure your fingers are on your face so we can use them in the lesson!
Save (share) your photo to your student gmail or student google drive.
Now you should be able to find it on your computer.
If you get stuck on how to get it into Photoshop, just ask Johnson!
Anyway, it will look something like this.
You might want to pose “Zombie-Like”.
Hit COMMAND + J to COPY the LAYER.
STEP #2
Choose the MAGNETIC LASSO TOOL (It’s hiding under the other Lasso tools!).
Trace around your skin! (See video below).
Go to: Image > Adjustments > Hue/Saturation, slide the slider around and make your skin look “dead.”
Just play with the settings until you look dead!

STEP #3
Find a Picture of a Skull!
Find a picture of a skull on the internet and copy it …
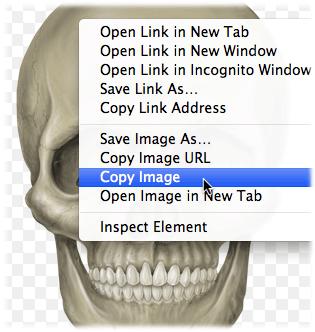
and EDIT>PASTE the skull over the face!
Erase the parts of the picture you don’t need.

Hit the keyboard shortcut COMMAND + T and resize the skull so it fits over your face.
(If you forgot how, see video below).
Try LOWERING THE OPACITY of the SKULL LAYER.
So you can see thru the background.
Of course, sometimes the skull and your face don’t match up well
Make sure you skull is still selected, if not hit COMMAND + T.
CONTROL + CLICK inside the selection and select WARP.

You will have more control over the perspective.
Check out how to use the WARP feature below.
STEP #4
Select a FUZZY ERASER.
Click the ERASER TOOL and click on Brush Preset picker in the Menu Bar.
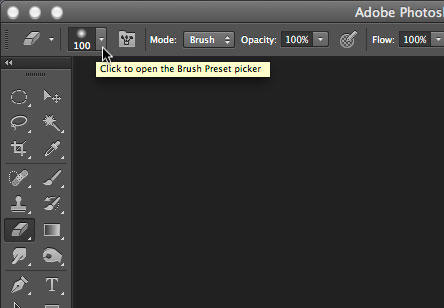
and choose a Soft round brush.
STEP #5
Erase part the skull to reveal the face.
Erase certain areas so that only part of your face is covered.

STEP #6
MAKING BLOODY SCARS!
Make a new Layer.

Get the Lasso Tool or hit the keyboard shortcut letter (L)

Make a outline of where you want a bloody scar to be.

Use the Paint Bucket to fill the selected area with Red.
(Remember How?)

STEP #7
The SMUDGE TOOL
Hit COMMAND + D to DESELECT.
Select the SMUDGE TOOL.

Start making the blood look like it’s dripping by SMUDGING IT!

STEP #8
Next, get the Burn Tool or hit the shortcut letter (O)

Swap the range from Shadows to Midtones to Highlights until you find what works.
And try turning off Protect Tones.

Try a large grungy brush.
Also raise and lower the Exposure as needed.
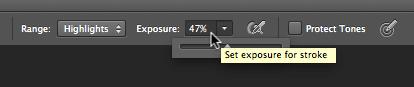
And burn burn burn!
Burn around the edges to darken the area where the cut runs deepest edges to add the illusion of depth..

STEP #9
Go to: Filter > Filter Gallery > Texture > Texturizer
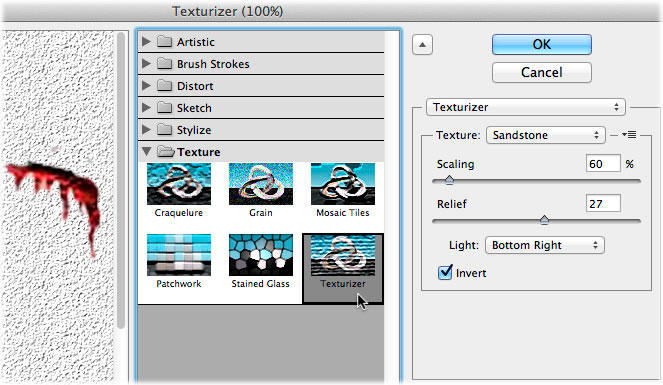
Try whatever other Filters you like best.
STEP #10
More Gross Stuff!
Find images of wounds, etc., and apply steps #1 thru #3 again.
STEP #11
Make sure to add a creepy background before you submit it!
From your program, go to FILE>SAVE AS and choose DESKTOP,
then drag from the DESKTOP to GOOGLE DRIVE and the Correct Class Folder.
Save your final file in Google Classroom.
Just add the file from Google Drive.
This site provides information using PDF, visit this link to download the Adobe Acrobat Reader DC software.